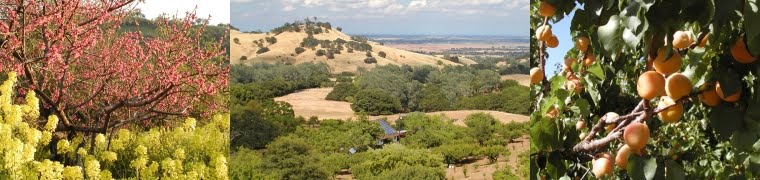
Sunny Slope Orchard

Sunny Slope Orchard
In the coast range foothills overlooking the Sacramento Valley

Wednesday, May 8, 2013

The magic of grafting

Why is grafting necessary?
The seeds of most stone fruits will not reproduce fruit identical to the parent. In addition, such seedlings may not be hardy, disease resistant or vigorous. So healthy long-lived fruit trees are made by grafting, which is the joining of two different plants so they grow as one. In the case of fruit trees, the fruit bearing part ("the scion") of the desired fruit variety is grafted onto the root and lower trunk ("the rootstock") of a compatible variety. In my previous post I described how to produce your own rootstocks from root suckers of existing trees. Here I will show some of my favorite grafting methods.

Other reasons for grafting
I graft onto rootstocks to make new fruit trees from scratch, but also to restore older trees where their tops have died back but that still have viable roots. A more common reason to graft is to add additional varieties to an existing tree. For instance by grafting additional types of peaches onto a single backyard tree you can enjoy an extended harvest as each variety ripens in succession. Still another purpose of grafting is to change a tree to a different variety of fruit altogether, in cases where one variety is not performing well in a given climate or an improved variety is favored.

The mechanics of grafting
The basic principle of grafting is that the cambium layers of both rootstock and scion must be mated together so they will ultimately connect. The cambium is the one or two cell-thick layer of tissue responsible for expanding growth of plants. In fruit trees, this is basically the boundary between bark and wood.

I use two basic types of grafting. Dormant season grafting is done before spring growth starts, when both the rootstock and scion are dormant. The second type, bark grafting, is done after the rootstock begins growth in spring, but with scion collected in winter and artificially kept dormant by refrigeration. I've had good success with both and often choose one or the other based upon convenience and work schedule. For either dormant or bark grafting there are multiple ways of forming the graft union depending upon the size of the scion and rootstock.


A wild plum root sucker sprouting
from the base of an old apricot tree
Dormant grafting
At right is an old apricot tree with the top dying back, but a vigorous sucker has sprouted from the wild plum rootstock low on the trunk. So to preserve the tree I grafted apricot onto the rootstock sucker, and if the new graft grows well the original trunk can eventually be completely cut off leaving a new apricot top on the original roots. I've done this on many of our trees with good success. Most often the new top will grow very quickly since it has a full grown root system already in place.

In this case I did a dormant season "whip" graft, selecting apricot scion from a healthy dormant cot tree. The scion wood is cut in mid to late January while still completely dormant, and the grafting done immediately. 


Apricot scion matches the
wild plum rootstock diameter

For a whip graft the scion should be the same diameter as the rootstock sucker so the cambium layers of both will have maximum contact. The scion is cut to a short length having 2-3 buds.


Matching cuts on scion and rootstock

 Using a very sharp knife, matching tapered cuts are made to both parts. Success depends upon good contact between the two parts. After making the knife cuts I generally refine the cut with a sharp block plane to ensure perfect joints.


Refining the bevel cut with a block plane


A notch cut is made about 1/3
the length of the bevel cut


Next a matching tongue is cut in the bevel of both scion and rootstock. This allows the two parts to interlock and increases contact area of the cambium layers.


The scion assembled
into the rootstock 


Scion and rootstock are then slid together, with the tongue cuts interlocking. Side to side lineup is important to ensure the cambium layers contact.


Scion and rootstock are held
together with rubber band


The scion and rootstock are then wrapped tightly with rubber band or green stretchy plant tie tape.


sealing the graft joint and
scion end with grafting wax


All exposed cut tissue must be immediately sealed with grafting wax or other sealer to prevent drying out.


Finally, a paper bag should be tied over the graft to protect from drying winds and bird damage to the buds. After 3-4 weeks a slit can be cut in the bag to monitor progress of the graft. This shot was taken January 20th. For the next few weeks I peek impatiently at the graft, waiting to see growth.


On March 3, the scion has begun to grow, but this is a critical stage - the paper bag must be kept in place to protect from birds and drying winds.


By March 21 I see success, the graft has definitely taken. Protection from high winds and physical damage is still needed, but my future replacement tree is on its way.


Bark grafting
Rootstock sucker cut off and ready
to accept multiple grafts
At right is another candidate for "reincarnation". The top of this old peach tree is in decline, but the root system is strong and has sent up suckers. I will graft the original Springcrest peach scion onto the rootstock suckers, creating a new top on the original root system. The branched sucker offers multiple sites for grafting which will increase the chances of success.


With bark grafting the rootstock must be coming out of dormancy so the bark peels freely from the core. So beginning in mid-late March I test for "bark slipping" by making a shallow "T" shaped cut in the rootstock bark and test with the point of a knife to see if the bark will easily lift and separate from the wood below. When the time is right and the spring sap is beginning to flow the thin bark will lift easily and separate from the wood inside.

Here I have cut off the large 1" diameter rootstock sucker and also two 3/8" diameter side shoots.


Bevel cut on scion
On the 1" rootstock I will insert two scions. For larger stems more scions could be used to speed healing of the graft union.

First scions are selected and cut to length with 3 buds. A smooth bevel cut is made on the scions, opposite the lower bud.   


Next, a shorter bevel cut is made on the opposite side, leaving a chisel edge that will slide easily between the bark and wood of the rootstock.


Then two vertical cuts in the bark are made, matching the width of the scions. The scions are then slid in under the bark.


Rubber band or green stretch tape is then used to bind the scions tightly in place.


All exposed cuts are then sealed to prevent drying out. I have found elastomeric roof coating to work very well.


Now for the 3/8" diameter sucker I use a "four flap" graft. This is a can't-miss technique since it offers much more cambium contact than any other method. 


Scion prepared for "four flap" graft


For the four flap graft the scion must be the same diameter or slightly larger than the rootstock. Four flats are carved into the scion, leaving a thin line of bark at each corner.


Rootstock prepared with four
vertical cuts through the bark


The rootstock is prepared by making four vertical cuts and peeling back the bark like banana peels. 


Then the woody core of the rootstock is cut off.


Next the scion is set in place and wrapped tightly within the flaps of rootstock bark. All grafts are then sealed and covered with paper bags while I wait hopefully for signs of growth.


Successful grafts


At left, all four scions have taken and are growing well. 

The above are just some examples of grafting technique. There are many more, easily found through online research or horticultural organizations. 

I always enjoy grafting, I guess because it seems somehow magical that two growing organisms can be spliced together like woodworker's cabinetry joints and then begin growing as one plant. My first grafting experience was as a child, carving holes into the big broad leaves of my mother's prickly pear cactus and plugging in small pickle-shaped cacti of another type. Seeing the little peanut cactus growing out of the side of a big broad cactus leaf was fascinating, and I still enjoy seeing the magic today.

Monday, March 25, 2013

Home made fruit trees

When I bought our property in 1971 the orchard was a motley assortment of neglected and dilapidated fruit trees, relics from the famous Vacaville early-ripening fruit region. But it was late May and delicious cherries were ripe, followed soon by Royal apricots, Spring Crest peaches and various plum varieties, all with flavor beyond anything I had ever experienced. Without question I took on the job of preserving those old trees and propagating more.

When I talked about planting more trees, my old Italian neighbors showed me how their father started his orchards from scratch. Upon immigrating from Italy, he started most of his own trees by rooting cuttings and grafting them. Having little money but ample youthful ambition, I did just that.
Scion from Royal apricot being prepared
for grafting to wild plum root stock

Because a tree grown from the seed of a great apricot, peach or plum will not produce the same fruit as the parent, these and many other fruits are propagated by grafting wood from the desired variety onto a particular root stock. The root stock is a compatible type of tree that has good disease resistance and vigor but does not usually produce great fruit of its own. Apricots and plums are normally grafted onto a wild plum root stock. Peaches must grow on a wild peach root, and cherries on a wild cherry root.

Fresh leaves indicate this peach root stock
cutting has begun to take root. It will be grafted
to a Springcrest peach the following winter
So my old neighbors showed up one winter day with a handful of dormant wild plum cuttings, 15"-18" long lengths of suckers that had sprouted from the base (below the apricot graft union) of their homestead apricot trees during the previous year. As instructed, I stuck them in the garden about 6" deep and kept the soil wet. In spring the cuttings began to sprout leaves. Keeping them well watered, I let them grow through the summer, developing root systems and small branches.

The next winter I dug the dormant rooted cuttings and planted them out in the orchard, filling in empty spaces in the grid. After this second season of growth, I then grafted them to apricot or plum the following dormant season. Now except for a handful of original trees, our apricot, peach and plum trees have all been "home made" just this way.

Next post I'll show some of my favorite methods of grafting. Meanwhile, our warm dry spring has been perfect for pollination, so most trees are bristling with tiny fruit free of the fungus spots caused by late season rains. On the down side the lack of rain means low well levels and lots of stress for the trees this summer. But like us they will just have to make do with what they have.

A new peach tree in its
second year after grafting.


A grafted peach in its fifth year

Tuesday, January 15, 2013

Our Barn Owl Rodent Patrol


A family of barn owls comes out of their hollow tree
In the early days gophers were a constant problem, devouring our garden vegetables and gnawing through roots of young trees. Then one Spring we noticed a family of barn owls nesting in an old oak tree across the road. Watching with binoculars at night, we could see the parents flying in and out of the nest, a hollow cavity in an old branch, delivering rodents to their young.

Upon reading that a nesting pair and their young can eat more than 1000 rodents per year, I began making and installing barn owl nest boxes on and around our property. I felt that additional nesting sites would help establish a local colony. Given the declining number of barns and large old trees with hollow nesting cavities, it turns out that nest boxes are a sure way to encourage owls to live and breed in an area.
Four young barn owls in their tree trunk nest

The same owls just two weeks later
Now years later, our gopher problems have gone from out-of-control to insignificant. Many years we've had a bumper crop of new owls from multiple nest boxes, often with five to seven owlets per nest. 
I would strongly encourage anyone with rodent problems, or anyone just wanting to encourage owl populations, to  consider putting up a nesting box or two. Just Google "barn owl nest boxes" and you'll get a wealth of information. 

Young owls in a plywood nesting box

Above are five young barn owls inside one of my nest boxes. Note the age difference - the mother lays an egg every day or two, but begins sitting after the first egg is layed, resulting in staggered hatching and quite an age difference among the chicks.

Seven young owls crowded in their box
Above is a big family of seven owlets. We noticed the parents roosted elsewhere, appearing only after dark to hunt and drop off food for the young.


To take these shots, I waited until dark when the adults went out hunting, then climbed the tree and used a digital camera with flash.


Above is one of the adults, relegated to roosting in a tree since the nest box was overcrowded with young.


This adult peeks out of his box. I locate the boxes to give the owls
as much privacy and safety as possible, but it is a great joy to catch
a glimpse of them using binoculars or a telephoto lens.

A young owl takes his first tentative hop,
from the nest opening to a nearby branch
It is a real pleasure to walk outside at dusk and catch a glimpse of an owl, cruising silently over the orchard, on patrol for rodents. Who says you can't find good help anymore?


Saturday, December 15, 2012

Some pruning tips


The orchard trees are dormant and now it's time for their annual pruning. This job is essential for maintaining tree health and fruit production, and keeping their size manageable. It is a big job involving hundreds of cuts on each tree. But it's also a creative one, like a type of sculpture, where I get to guide the tree's form and hopefully maximize its health and vigor.

In a previous post I discussed some general principles and objectives of pruning stone fruit trees. These were:
  • controlling tree size and shape
  • stimulating growth of new fruiting wood
  • opening up space for sunlight and air to reach all parts of the tree
  • removing dead or damaged wood
Here I'll show some of the details involved in good pruning practice.

Pruning tools
The photo above shows the basics - a three legged orchard ladder (the only type suitable for uneven ground), loppers for medium cuts, pruning saw for larger cuts, and bypass type hand shears for smaller cuts. Most importantly the tools need to be sharp and the pivots of the loppers and shears kept snug and oiled. Dull, loose tools make ragged cuts that will not heal quickly. I touch up my blades with a file or stone every few hours of use.

What to cut
Since most stone fruits are born on 2-3 year old shoots, always look for opportunities to remove older wood in favor of newer. The photo below left shows an older, silvery looking apricot shoot next to a newer, two year old shoot. The area is too crowded so the right side photo shows the older wood removed along with one shoot of the newer.


The photo below shows young apricot fruit spurs. These will bear for several more years so this branch would be a high priority to keep if possible. If the newest growth from the end is too long or hanging too low, that portion can be cut back to a few inches long.

The left side photo below shows the effect of pruning, namely that it stimulates future growth mostly right at the point of pruning. The red arrows show where two long shoots were cut back in January 2012, with the result that 2-3 buds near each of those cuts grew into very long shoots in the Spring. Left unpruned, this dense growth will shade out growth lower in the tree, will leave the tree taller than I want, will rub together in the wind, and with a heavy fruit set may break off. The right side photo shows the shoots thinned from 3 to 2, and the remaining ones shortened by 3/4 or more.


Dead wood can attract disease, adds to clutter in the tree, and can damage fruit that might rub against it in the wind. So always remove dead wood, even small twigs as pictured at right.


Where to make cuts
The bigger the cut the more easily disease can enter the tree through the wound. And large saw cuts may never heal over completely. But careful and neat pruning can minimize the risk. When completely removing a side shoot from a branch you should avoid leaving a stub. This does not exactly mean cutting it off "flush" but rather just beyond the "collar." The photo at right shows the pruners positioned slightly away from the main branch, at the narrow point of the collar. This will leave a wound about half the size of one made perfectly flush to the main branch. It also creates the wound at an area of intense sap flow and hence faster healing.

And by the way, applying a sealer or "wound dressing" has not been shown to speed healing and may even harbor disease organisms in pruning cuts.


When making heading cuts (shortening a branch rather than completely removing it), you can somewhat direct the resulting new growth. In the photo at right, the cut is made just above an outward facing bud. This will tend to encourage further spreading of the tree. But when a branch is already extended quite far you might choose to cut to an inward facing bud or side shoot.


When heading a branch back to a lateral, that lateral should be at least one third the diameter of the branch being cut. Otherwise the lateral has little chance of surviving. The photo at right shows the wrong place to head back (red X) versus the better choice (removing completely at the green line). If a cut is made at the red line, the tiny lateral will be right next to a large wound and will likely die.

The next two photos show a small apricot tree before and after pruning. Too-long shoots have been headed back to make the tree strong and stocky, and many have been removed to eliminate crowding and allow light penetration. All cuts were made with an eye toward replacing older wood with newer, keeping the tree to a workable height, and maintaining ladder access for thinning and harvest. Another critical point for our hot summer climate is leaving plenty of small shoots on the south and west facing branches to prevent sunburn. It's hard to show all this with two dimensional photos, but clicking on each to enlarge might give give you a better idea.

Before pruning

After pruning
Of course each type of tree has its own growth habit and therefore slightly different pruning needs. Here are some resources that might be useful:


Thursday, November 15, 2012

Persimmons

Our Fuyu persimmons are plentiful now and we should have them through mid December. For those not familiar with this tasty Fall fruit, Fuyus are the type of persimmon that can be eaten firm. They are mild and sweet, delicious eaten like an apple or peeled and sliced into fruit or green salads. They also make a great dried fruit.

Fuyus with lime
But once again we have to mention our favorite special fruit plate: sliced Fuyus with lime. This simple yet exotic taste combination always gets "wows" when served to guests. Just peel with a vegetable peeler, slice into rounds about 1/4" thick, and drizzle with a bit of fresh lime juice. The sand dollar-like markings inside the fruit also add visual appeal to this amazing dish.

More information on persimmons can be found here and here.

We also have Hachiya persimmons. These are the type that need to be ripened off the tree until fully soft before eating. Once gooshy soft they are like jam inside a skin, super sweet and perfect to spoon directly over oatmeal or pancakes. The sweet pulp can also be used in cookies or fruit bars.

Always call ahead (707-448-4792) before coming out to make sure we're here and have fruit for sale.


Wild grapes decorate the creek banks each Fall

Wednesday, October 24, 2012

The first rainy days, it's time for soup!


The first rains of fall delivered many pleasures, freshly-washed air and gorgeous clouds among them. The trees appreciated the shower; their leaves immediately perked up and absorbed the moisture. Our soil is now soft underfoot and the dried leaves and grasses are quiet too, no longer crunching underfoot. We now turn our thoughts to planting the winter cover crop in the orchard. If there is a good dry spell this weekend we'll have our chance.
 
Meanwhile, we have a new recipe to share. Our neighbor Judy gave us a butternut squash from her garden. We had apples from Bill’s mother in Mendocino County and some onions from our garden. The result was a smooth and hearty soup, perfect for autumn.

Curried Butternut Squash and Apple Soup
Pre-heat the oven to 450 degrees. Put a large roasting pan on the lower middle rack and pre-heat it too.

Roasting Ingredients, group 1:
  • Butternut squash, about 2 pounds, peeled, seeded and cut into 1 ½ -inch chunks
  • 2 medium size onions (or 3 shallots) peeled and quartered
  • Golden delicious apples, 1 pound, peeled, quartered then chopped in half
  • 1 Tablespoon canola oil
  • ½ tsp. salt (or less)
  • ¼ tsp. pepper (or to taste)
Put all the above in a large bowl and toss. Put this mixture into the pre-heated roasting pan, spreading it out evenly.  Roast it until the squash is soft and slightly brown, probably 50 to 60 minutes. Stir the mixture halfway through the roasting time.

Soup Ingredients, group 2
  • 4 cups low-sodium chicken broth
  • ½ cup water
  • ¼ cup half-and-half
  • 1 Tbsp. Maple syrup
  • ½ tsp. curry powder
When the roasting pan comes out of the oven, add about ½ cup of the broth to the pan, then scrape up the brown bits off the bottom; add a little more broth if needed to get the bottom clean. Return pan to the oven for a few more minutes if there is still liquid visible. Otherwise, turn off the oven and get out the blender.

Combine the broth, water, and the roasted mixture in the blender until smooth, working in two or three small batches. Put everything in a Dutch oven or soup pot and add the syrup, half-and-half, and curry powder. Adjust salt and pepper to taste. Heat gently until hot enough to serve.

Recipe taken from America’s Test Kitchen Light & Healthy 2010, pp. 38-39