Sunny Slope Orchard

Sunny Slope Orchard
In the coast range foothills overlooking the Sacramento Valley

Saturday, May 25, 2013

Our orchard bird scare machines - don't laugh, they work!

Surrounded by woodlands, we have a high population of birds so our little orchard is a magnet for fruit eaters. And being the only active orchard nearby, every bird in the area has us in their sights. We used to lose 50% or more of our fruit to birds, so out of desperation I started experimenting with mechanical means of bird control a few years ago. The result is several home made bird scare machines that have been really successful, reducing our losses to below 5%.

Though these contraptions take major effort and time to set up and maintain every year, we would not be able to leave the fruit on the trees long enough to fully ripen without them. Since our passion is growing fruit with the best flavor, we do what we need to do to get that tree-ripened quality. And as a bonus, these devices get lots of smiles from passersby.

My first design below we christened "Bye-Bye Birdie". This one effectively prevents bird damage in the immediate area, about a 100 ft. diameter circle, and can be moved from place to place with the tractor as different trees ripen:


To cover larger areas I came up with the "Rope-a-dope" systems in the next videos. These are temporarily set up in a given area just before harvest, then taken down for storage. This first one covers about 1/4 acre with around 50 mature apricot trees.  


This next one covers a similar sized block of peach trees.


And this one uses just a single rope strung over three cot trees that are away from the main group.


Another system in my arsenal is the "bird blower." This uses an electric leaf blower, run through PVC pipes, to power flapping plastic bags. It can be easily set up to defend a single tree or expanded to cover larger areas. For hard to protect crops I alternate between this system and the rope-a-dope to keep the birds wary.


So this time of year we have to put up with a bit of noise and fairly frequent repairs and tweaking of the bird scare machines. But without them we would not be able to provide customers with truly tree ripened fruit, or the hearty chuckles they get when witnessing the dancing ropes and milk jugs for the first time.


Monday, May 20, 2013

Our 2013 harvest projection


Our dry warm spring has produced a heavy fruit set with very little fungus damage. Peaches are looking gorgeous as always, and the cots, which always suffer fungus spotting during rainy springs, are looking more perfect and spot-free than they have in several years. After a busy spring of thinning excess fruit, foliar nutrient feedings, mowing down the cover crop and banding tree trunks with Tanglefoot to prevent earwig damage, we're looking forward to a great harvest season. We are now getting close to harvest, setting up our famous bird scare machines and watching closely for any last minute problems. Today (May 20th) we've just eaten our first ripe apricots and have four almost-ripe peaches on the kitchen counter. We're feeling our annual fruit fever taking hold. 

Right now our best estimate is fruit sales will begin approx. June 1. We will be emailing our customer list with updates as we know more. Anyone wanting to receive email notices of fruit sales please send an email to sunnyslopeorchard@gmail.com to be added to our list.


Wednesday, May 8, 2013

The magic of grafting

Why is grafting necessary?
The seeds of most stone fruits will not reproduce fruit identical to the parent. In addition, such seedlings may not be hardy, disease resistant or vigorous. So healthy long-lived fruit trees are made by grafting, which is the joining of two different plants so they grow as one. In the case of fruit trees, the fruit bearing part ("the scion") of the desired fruit variety is grafted onto the root and lower trunk ("the rootstock") of a compatible variety. In my previous post I described how to produce your own rootstocks from root suckers of existing trees. Here I will show some of my favorite grafting methods.

Other reasons for grafting
I graft onto rootstocks to make new fruit trees from scratch, but also to restore older trees where their tops have died back but that still have viable roots. A more common reason to graft is to add additional varieties to an existing tree. For instance by grafting additional types of peaches onto a single backyard tree you can enjoy an extended harvest as each variety ripens in succession. Still another purpose of grafting is to change a tree to a different variety of fruit altogether, in cases where one variety is not performing well in a given climate or an improved variety is favored.

The mechanics of grafting
The basic principle of grafting is that the cambium layers of both rootstock and scion must be mated together so they will ultimately connect. The cambium is the one or two cell-thick layer of tissue responsible for expanding growth of plants. In fruit trees, this is basically the boundary between bark and wood.

I use two basic types of grafting. Dormant season grafting is done before spring growth starts, when both the rootstock and scion are dormant. The second type, bark grafting, is done after the rootstock begins growth in spring, but with scion collected in winter and artificially kept dormant by refrigeration. I've had good success with both and often choose one or the other based upon convenience and work schedule. For either dormant or bark grafting there are multiple ways of forming the graft union depending upon the size of the scion and rootstock.


A wild plum root sucker sprouting
from the base of an old apricot tree
Dormant grafting
At right is an old apricot tree with the top dying back, but a vigorous sucker has sprouted from the wild plum rootstock low on the trunk. So to preserve the tree I grafted apricot onto the rootstock sucker, and if the new graft grows well the original trunk can eventually be completely cut off leaving a new apricot top on the original roots. I've done this on many of our trees with good success. Most often the new top will grow very quickly since it has a full grown root system already in place.

In this case I did a dormant season "whip" graft, selecting apricot scion from a healthy dormant cot tree. The scion wood is cut in mid to late January while still completely dormant, and the grafting done immediately. 


Apricot scion matches the
wild plum rootstock diameter

For a whip graft the scion should be the same diameter as the rootstock sucker so the cambium layers of both will have maximum contact. The scion is cut to a short length having 2-3 buds.


Matching cuts on scion and rootstock

 Using a very sharp knife, matching tapered cuts are made to both parts. Success depends upon good contact between the two parts. After making the knife cuts I generally refine the cut with a sharp block plane to ensure perfect joints.


Refining the bevel cut with a block plane


A notch cut is made about 1/3
the length of the bevel cut


Next a matching tongue is cut in the bevel of both scion and rootstock. This allows the two parts to interlock and increases contact area of the cambium layers.


The scion assembled
into the rootstock 


Scion and rootstock are then slid together, with the tongue cuts interlocking. Side to side lineup is important to ensure the cambium layers contact.


Scion and rootstock are held
together with rubber band


The scion and rootstock are then wrapped tightly with rubber band or green stretchy plant tie tape.


sealing the graft joint and
scion end with grafting wax


All exposed cut tissue must be immediately sealed with grafting wax or other sealer to prevent drying out.


Finally, a paper bag should be tied over the graft to protect from drying winds and bird damage to the buds. After 3-4 weeks a slit can be cut in the bag to monitor progress of the graft. This shot was taken January 20th. For the next few weeks I peek impatiently at the graft, waiting to see growth.


On March 3, the scion has begun to grow, but this is a critical stage - the paper bag must be kept in place to protect from birds and drying winds.


By March 21 I see success, the graft has definitely taken. Protection from high winds and physical damage is still needed, but my future replacement tree is on its way.


Bark grafting
Rootstock sucker cut off and ready
to accept multiple grafts
At right is another candidate for "reincarnation". The top of this old peach tree is in decline, but the root system is strong and has sent up suckers. I will graft the original Springcrest peach scion onto the rootstock suckers, creating a new top on the original root system. The branched sucker offers multiple sites for grafting which will increase the chances of success.


With bark grafting the rootstock must be coming out of dormancy so the bark peels freely from the core. So beginning in mid-late March I test for "bark slipping" by making a shallow "T" shaped cut in the rootstock bark and test with the point of a knife to see if the bark will easily lift and separate from the wood below. When the time is right and the spring sap is beginning to flow the thin bark will lift easily and separate from the wood inside.

Here I have cut off the large 1" diameter rootstock sucker and also two 3/8" diameter side shoots.


Bevel cut on scion
On the 1" rootstock I will insert two scions. For larger stems more scions could be used to speed healing of the graft union.

First scions are selected and cut to length with 3 buds. A smooth bevel cut is made on the scions, opposite the lower bud.   


Next, a shorter bevel cut is made on the opposite side, leaving a chisel edge that will slide easily between the bark and wood of the rootstock.


Then two vertical cuts in the bark are made, matching the width of the scions. The scions are then slid in under the bark.


Rubber band or green stretch tape is then used to bind the scions tightly in place.


All exposed cuts are then sealed to prevent drying out. I have found elastomeric roof coating to work very well.


Now for the 3/8" diameter sucker I use a "four flap" graft. This is a can't-miss technique since it offers much more cambium contact than any other method. 


Scion prepared for "four flap" graft


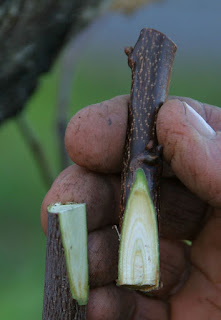
For the four flap graft the scion must be the same diameter or slightly larger than the rootstock. Four flats are carved into the scion, leaving a thin line of bark at each corner.


Rootstock prepared with four
vertical cuts through the bark


The rootstock is prepared by making four vertical cuts and peeling back the bark like banana peels. 


Then the woody core of the rootstock is cut off.


Next the scion is set in place and wrapped tightly within the flaps of rootstock bark. All grafts are then sealed and covered with paper bags while I wait hopefully for signs of growth.


Successful grafts


At left, all four scions have taken and are growing well. 

The above are just some examples of grafting technique. There are many more, easily found through online research or horticultural organizations. 

I always enjoy grafting, I guess because it seems somehow magical that two growing organisms can be spliced together like woodworker's cabinetry joints and then begin growing as one plant. My first grafting experience was as a child, carving holes into the big broad leaves of my mother's prickly pear cactus and plugging in small pickle-shaped cacti of another type. Seeing the little peanut cactus growing out of the side of a big broad cactus leaf was fascinating, and I still enjoy seeing the magic today.