Sunny Slope Orchard

Sunny Slope Orchard
In the coast range foothills overlooking the Sacramento Valley

Sunday, March 18, 2012

Orchard Acvtivities Winter to Spring


This winter was the wet season that wasn't. The Fall rains we count on to get the cover crop growing were few and too far between. But by moving drip lines around several times a day for weeks, the peas, bell beans, vetch and mustard mix actually put on some respectable growth. Despite our very limited well water the place has looked like an oasis of green since November compared to the surrounding hills.

A couple of teaser storms in January raised our hopes, but as the trees awakened from dormancy in early February there was no rainfall in sight. So I mowed down most of the cover crop to stop it from consuming soil moisture, and began doling out meager amounts of water again, this time to benefit the trees.

Little apricots
We were rewarded with a very heavy bloom and the promise of a heavy fruit set. And so far things look good, with most trees bristling with little apricots, peaches and plums.

So now we continue into Spring with our usual conflict of interest: we want lots of rainfall to help the trees through the coming dry summer and to recharge our aquifer, but apricots, especially, are really prone to fungal diseases in wet weather so a dry spring makes for clean fruit. With some luck we will receive the right balance of help and harm from mother nature.


In other news: Composting
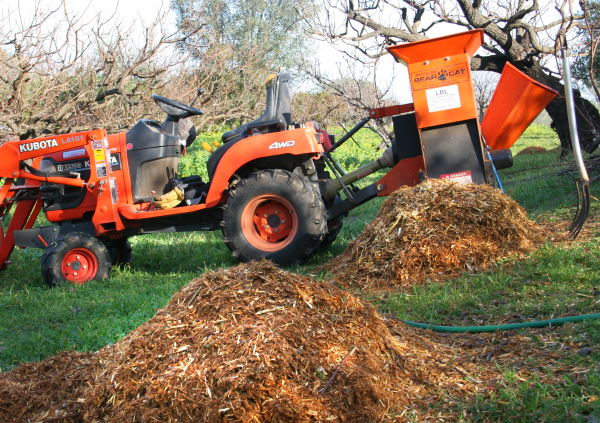
Following pruning, one of winter's chores is chipping up all the orchard brush and making compost. Like everyone else I used to burn orchard prunings every spring. But after awakening to the huge value of compost as a soil additive, I can't stand to see this resource go to waste. One only has to walk into an undisturbed forest, scrape away the top two inches of rotting leaves and bark, scoop up a handful of soil and take a sniff to understand where soil nutrients come from. It will smell moist, earthy, sweet and fragrant, teeming with fungus and microbes cycling nutrients back into the soil. In contrast, grab a handful of dirt from a finely cultivated agricultural field and you get finely powdered minerals smelling of dust. One is soil, the other is just dirt. One feeds the plants, the other just keeps the plants from tipping over in the wind. Organic matter is the difference. So any crop waste we can return to the soil is a net gain in fertility.

Composting is a process of maximizing the nutrient value of organic matter while destroying weed seeds and pathogens with heat. This requires the right proportions of moisture, carbon, and nitrogen for biological life to digest the raw ingredients and turn them into plant-available nutrients. To the chipped prunings I add horse manure from a neighbor's ranch and enough moisture to dampen. When the recipe is right the microbial activity heats the pile up and breakdown happens quickly.

Healthy decomposition needs to be aerobic, so to keep things cooking well I assemble the pile with perforated drain pipes inside to keep oxygen available. For the first 20 days or so I turn the pile every few days with the tractor to ensure all materials are evenly digested. After a few weeks the pile cools off and earthworms, molds, and other critters continue digesting the raw materials into fertilizer. It then goes back into the orchard and ultimately into new growth of trees and fruit.

Tuesday, January 24, 2012

Mid-Winter Rain Celebration

We are in a cheerful mood after a generous storm last weekend dropped nearly six inches of rain on our orchard and garden. The effects of this water were immediately obvious: green moss magically appeared on rocks, the cover crop perked up, and the soil feels soft underfoot like a carpet.

To celebrate, we reached into the pantry for a jar of the pears that we canned last summer and proceeded to make Pear Gingerbread, one of our favorite winter desserts. Perhaps you will be tempted to try it in your kitchen too.

This recipe is adapted from Joy of Cooking; the original source recipe is on page 681 in our edition of this classic cookbook.  
Pear Gingerbread
Preheat oven to 350 degrees. Grease a 9 x 12” baking pan with butter. Take a quart jar of pears and drain off all the liquid, reserving it for use later. Place the pear halves, cut side down, in the greased pan.
Melt 1/2 cup butter in a heavy pan and let cool. In a large bowl, combine ½ cup sugar and 1 egg with the melted butter and beat well.
In a medium bowl, sift (or whisk) together 2 ½ cups flour, 1 ½ tsp. baking soda, 1 tsp. each ginger and cinnamon, and ½ tsp. salt. Note: the original recipe calls for all-purpose flour, but we usually use whole wheat flour for at least ½ of the total amount of flour.

Heat one cup of the reserved liquid from the jar of pears until quite hot but not boiling. In a medium bowl or a very large capacity measuring cup, combine ½ cup honey, ½ cup molasses, the 1 cup of hot liquid, and 1 Tbsp. orange zest.
Add the flour mixture and the liquid ingredients alternately into the butter mixture, stirring until blended. Pour the batter over the pears in the pan to cover them completely, being careful not to let the pears slide around. Bake about 1 hour, then serve warm or cold. A topping of Santa Rosa plum compote goes well. And of course a generous blob of whipped cream doesn't hurt either!


Work on the farm continues year-round, but the pace definitely is more relaxed in the winter. The trees are all pruned now, looking tidy with well-spaced branches reaching upwards, waiting for the longer warmer days of Spring. With pantry shelves and freezers full of good food, we look around us and feel quite content and peaceful.
But, wait! It looks as if the apricot buds are starting to swell again….

Apricot fruit spurs, buds swelling

Friday, November 25, 2011

Persimmon season


Thanksgiving has come and gone and once again our favorite persimmon appetizer was a big hit, with family members vacuuming the plate bare in no time. We described this simple treat - peeled-and-sliced fuyu persimmons sprinkled with lime - in a post last year here. If you have not tried it and want to wow guests at holiday parties or just add a delicious fruit plate to Fall meals, look no further than Fuyus and lime.

We will have Fuyu persimmons for sale for the next few weeks. We are picking every few days so if interested please call ahead at 707-448-4792.
A slice of Fuyu persimmon

Along with tending to persimmons and the Fall vegetable garden we are enjoying the vibrant colors the season offers. Here are some recent sights:
Timothy grass
A wild grape leaf
Wild grape climbs a barbed wire fence
more wild grapes

Toyon leaves after a rain

Apricot leaves are falling

Sunday, October 30, 2011

Walnuts from tree to table

Cooler weather and shorter days are here. It's Fall again, the time when walnuts that have been maturing all summer are falling from their husks. Walnuts are nutritious, tasty and versatile and we eat the majority of our small crop ourselves throughout the year. Here we will share some tools of the trade that speed up both harvesting and shelling this locally abundant food.
For easiest harvesting we wait until most husks are at least split open. Then knocking the branches with padded poles or shaking the branches will easily release a shower of nuts onto the ground.
A walnut ready to fall from the husk

The Nut Wizard picks up objects like a vacuum cleaner
Picking up
Next is picking them up. That used to mean sore back time - bending over or crawling on hands and knees to fill buckets. But not any more! Since a friend told us about the Nut Wizard this once tedious job has become a breeze. This tool might at first look like just another gimmick, but in fact is a well made and very effective tool. Simply by rolling it over the ground it will pick up any type of nut, small to medium citrus, apples, golf balls and more. Roll it over walnuts and as if by magic they instantly pop inside the flexible wires of the rolling basket.

Then when full just lower it onto the included bucket hoop; this spreads the wires and the nuts fall into the bucket. It's so much fun to use you may be tempted to dump the bucket out and pick the nuts up again!


After harvesting, the nuts need to dry thoroughly before shelling. We spread them out on racks or in shallow boxes in a warm dry space for several days, until the meats become dry and brittle.

Shelling
Once dry it's time to shell the nuts. A hammer and hard surface is the most basic option, but here are two alternatives:

The Texas Inertia Nut Cracker - This is a great little device, easy to use and it yields mostly halves. Just place a nut in the cracking chamber, pull back on the rubber band powered plunger and release. The shell is shattered without damaging the nut meat. Although it cracks one at a time, the job goes fairly fast once you get a rhythm going. Works with most types of nuts.

The Davebilt Nut Cracker - This is a heavy duty hand cranked machine that cracks nuts continuously. Just load them into the hopper and crank away. It is easily adjustable for English walnuts, pecans and almonds. This is the one we use, though I've modified ours to run off of an electric motor. But even hand cranking it works much faster than a single nut device. It yields a good percentage of halves and some smaller pieces of nut meat. Definitely the way to go for anyone with a whole tree's worth of nuts.

Storage
Once shelled, the oils in nut meats quickly go stale. So as with much of the food we preserve we use our trusty Foodsaver to vacuum pack the nuts into compact book-shaped bags then store them in our freezer.

Granola Recipe
This is our version of an Epicurious recipe called Everyday Granola; for comparison purposes, you can check out the original recipe at this link. You might want to adapt the ingredients to your taste preferences as we did.

Dry ingredients:
3 cups old-fashioned oats
1 cup walnuts, chopped
1/2 cup sunflower seeds
1/4 cup pumpkin seeds
1/2 cup unsweetened shredded coconut
1 teaspoon cinammon

Mix the above ingredients together in a large bowl.

Wet ingredients:
2 Tablespoons canola oil
2 Tablespoons molasses
2 Tablespoons honey

Mix the wet ingredients together and warm gently on the stove or in a microwave so you can stir and blend them together. Drizzle the wet mix onto the dry ingredients and stir with a large spoon to coat the oat mixture evenly.

Put the mixture in a large rimmed baking sheet, spreading it out evenly. Bake in a 275 degree oven for about 30 minutes, stirring the mixture every 10 minutes or so to assure that it browns evenly. It should look golden brown when done and the nuts should taste pleasantly crunchy.

Serve for breakfast with yogurt, fresh or dried fruits, and/or milk.

Monday, October 10, 2011

Some favorite vegetable varieties

A lot goes into successful gardening, like fertile soil, kind weather, watering method, and pest control. One of the most important factors is expressed in the old saying, "the best fertilizer is the gardener's footprints," in other words, watch the garden closely and you will catch small problems before they become big.

Plant varieties are also important, and with so many available it pays to experiment to find those that are best suited to your soil and climate. Here I will list a few of our favorites, those that consistently do well in our well drained soil, hot summers and mild winters. I will also share some of our favorite sources of seed and starts.
Tomatoes
There are loads of great slicing toms, but for a good meaty sauce, salsa, soup and salad tomato we are sold on Juliet. These little guys are the sweetest things this side of Sungold, and bear nice clusters of perfect fruit all summer long. A perfect size to pop into your mouth, people invariably exclaim about their flavor. And since we process loads of soup and sauce, these are fast to process just by dropping whole into our Champion Juicer. We get starts locally from Morningsun Herb Farm.


Green beans
We've decided the only bean for us is a long bean variety. This one is called Red-Seeded Asparagus Bean from Baker Creek Heirloom Seeds. They are stringless, have great flavor, and are resistant to pests and problems. Best of all we find they are much faster to pick and to process than the same weight of shorter beans. We freeze extra for winter meals, and it takes no time at all to drop a big handful into boiling water, fish them out 2 minutes later with tongs, drop into ice water, then lay a bunch across a cutting board and cut into 1" pieces.


Okra blossom
Okra
This is the first year we've grown okra, so can't recommend a particular variety. But we can recommend it as a reliable and very heavy producer. While okra might sound like something you serve alongside squirrel or possum, it is actually a delicious and versatile vegetable that is easy to grow and, at least in our experience, has few pest problems. We preserved a lot by freezing. We grew Clemson this year, and may try one of the red varieties next season. The blooms are also spectacular.

Tree Collard
This unusual plant has become a mainstay in our garden. Being big fans of greens, we used to grow your typical varieties of kale and collards, annual cool season plants that live one season and die. But a few years ago a neighbor gave us a start of a tree collard, a perennial variety that becomes a tall bush that can be harvested continuously year after year. The plant looks ratty and flavor gets bitter in our hot summers, but when cool weather returns we can once again harvest from our perpetual fountain of greens without having to start new plants. They are reported to be only possible to propagate from seed, however ours flowered and seedlings sprouted where the seeds fell. Bountiful Gardens is one source of cuttings.

Broccoli
Probably our favorite vegetable, we've settled on Arcadia as the variety that does best for us. It produces huge heads, then after harvest continues to produce good sized side heads for weeks longer. This year we did a late spring planting and kept it under shade cloth. Here in October we are still harvesting side shoots from those plants. Meanwhile our mid-summer plantings are growing vigorously and should be ready to start harvesting in a few weeks.


Cauliflower
Known as Romanesco broccoli or Romanesco cauliflower, this unique plant is a must have for its looks alone. Someone once said it looks like a combination of geometry and vegetable. But in addition to its amazing decorative value, the taste is delicious and mild. This particular variety is Veronica.


Lettuce
There are lots of great lettuce varieties, and we often buy seed packets of mixes containing different colors and leaf shapes that really add interest to a salad. The one pictured here is Sanguine Ameliore from Baker Creek.


Cabbage
We are having great luck with a Chinese Napa cabbage variety called Minuet. It is really fast growing and mild flavored. We've had delicious results in stir fries, soups, stews and raw in a simple to make Napa cabbage salad (but we skip the butter and all the sugar in this recipe).


Carrots
Nelson has been the best performer for us, with wonderful flavor, early maturity and heat tolerance. In fact, starting in late winter we have been eating garden carrots continuously all summer. Because carrot seeds are so small and hard to sprinkle on the ground with even spacing, I like to buy "pelleted" seeds, which are coated with a clay substance to make them bigger and easier to drop singly into the ground.

We always do one special Spring planting of around 500 carrots that we run through the juicer for freezing. And when digging so many carrots there are always a few unusual shapes. So I can't resist showing off this amorous pair discovered during our last big dig.


Sources for onions, garlic, and potatoes
We have had great luck with onion starts from Dixondale Farms. Order online in the Fall and they arrive in January ready to plant. For garlic and potatoes, I use The Potato Garden which has great varieties and service.

Happy gardening!
Wednesday, September 28, 2011

Gardening Year 'round

Our second crop figs are all done now, so orchard work is down to cleanup and some summer pruning of low branches to make way for fall compost spreading and cover crop planting. Next up to harvest will be walnuts, pecans and persimmons later in the Fall.

So this might be a good time to share some of our home vegetable gardening tips. Our wonderful climate allows year round vegetable gardening, and being spoiled by the taste of fresh produce, we take full advantage of that. Our main challenges are getting the most mileage out of our limited summer well water, and extending the seasons by protecting plants from temperature extremes.

Taming the summer sun
In summer most water is reserved to drip irrigate the orchard, especially water hungry figs and citrus. So we don't grow any water-needy garden plants like corn or melons. And what we do grow is always heavily mulched and drip irrigated only as much as needed. We also cover all beds with at least a 30% shade cloth, suspended on PVC pipe hoops tall enough to walk under. The shade really takes the heat stress off the plants and also reduces their water needs. We use a 30% shade cloth for most crops, or two layers for 60% shade on heat sensitive plants.
A PVC hoop shade house
Chinese cabbage and broccoli
thriving despite summer heat
Year round cool season crops
We have even found that we can grow cool season crops like cabbage, broccoli and carrots all summer long by adding extra shade and using intermittent misters during the hottest part of the day. Using a special timer that runs an overhead misting line 3 minutes every half hour, these normally cool season crops grow like weeds. They mature much faster than during the cool months, so by making multiple plantings in succession we can keep the garden producing cool season crops almost continuously.

Cold protection
When cool fall weather arrives the shade cloth will come down so plants will get full sun. Then as the temperatures go from cool to cold, we cover the plants with "row cover", a lightweight fabric that helps protect plants from frost, wind, insects and winter bird damage while still letting in light and rainwater.

Crop rotations plus cover crops
May onions and carrots ready for harvest
To maintain soil fertility we rotate crops, never growing the same family of plant in the same bed in close succession. Adding fresh compost and planting a cover crop in rotation also lets the soil rest and, when later mowed down, provides a grow-your-own mulch and fertilizer. The bed at left grew winter legume cover crop last winter, then was mowed and planted with these onions and carrots.


Volunteer buckwheat cover crop
After harvesting the onions and carrots, I planted buckwheat, an excellent fast maturing summer cover crop that adds lots of organic matter and blooms heavily, providing food for beneficial insects. Not needing this bed again until next spring, I let the buckwheat go to seed, then mowed it down and irrigated which caused the new seed to sprout as shown at right. In another few weeks I will mow this down and plant a winter legume cover crop, which will be mowed down early next spring ahead of planting broccoli, cabbage and potatoes.

Young lettuce transplants, protected
from birds by plastic mesh
These successive plantings and mowings along with additions of compost keep the earthworms and soil microbes happily eating away producing nutrients, loosening the soil, and maintaining a healthy balanced soil. As a result these beds never need rototilling, only a bit of hoeing at most.


I planted these little lettuce starts the other day just by using two fingers to scoop a small hole a couple of inches deep in the mowed buckwheat cover crop residue, then plugging in my transplants. No tilling, minimal disruption of soil microorganisms, and they will grow all the way through final harvest with no added fertilizer.

Next post will be a review of some of our favorite vegetable varieties.

Wednesday, August 31, 2011

Drying Fruit - An age old method of preservation

Our favorite snack food:
Dried Fuyu persimmons, apricots, pears, figs and walnuts
Because fruit is such a perishable and delicate crop there is always a percentage of our harvest that:
a. is unmarketable due to belmishes, damage, or is too ripe to pack
b. is ripening faster than our customers will buy it
c. is too small a quantity to offer for sale but too much for us to eat fresh

In these circumstances we often turn to the ancient practice of drying. Because drying involves slicing up the fruit, damaged areas can be cut out, allowing us to salvage fruit that might otherwise go to compost. While salvaging extra fruit is one purpose, drying also creates an intensely flavored form of fruit that we can then enjoy well into the future. We do lots of canning and freezing as well, but drying creates a convenient form of fruit that we can grab and eat by the handful for quick energy throughout the year.

Fruit can be dried in a number of ways, from simply laying it out in the hot sun to using an electric dryer or oven. Commercially, most dried fruits are treated with sulfur dioxide as a preservative. We prefer not to use the sulfer treatment, and instead quick dry with either an electric or solar powered dryer, vacuum pack with a Food Saver machine, then store in a freezer. Done this way the fruit becomes super sweet and intensely flavored and retains its fresh dried color, taste and texture for as long as we keep it.

Here is what we have learned over the years:
  • Sun drying is slow, and the longer the process takes the more color and flavor degrade. Unprotected sun drying also invites insects to contaminate the fruit.
  • The faster the drying process the better the flavor and color are preserved, so cut large fruits into smaller pieces.
  • Electric dryers can work well if they have both heat and fan driven air. Simple electric dryers that have only a small heat source and no fan are not efficient.
  • Do not over dry. When the fruit cools off it will seem much dryer than it did while still hot in the dryer, so stop when you think it's not quite dry enough.
  • Unsulfured dried fruit will continue to lose color and flavor, will get harder and is subject to insect attack if left exposed to air, so vacuum packing is best.
  • Vacuum packing and freezing preserves the fresh dried quality for two years or more.
  • Vacuum packing dried figs
  • The texture actually improves further in the vacuum bags, as the moisture content between the fruit's thicker parts and thinner edges equalizes. When opened up later, fruit packed this way has a wonderful soft caramel quality.


During the hottest weather we use our home built solar dryer. It uses a photovoltaic panel to run an electric fan, which draws air across a hot metal plate and through the drying chamber. The chamber has multiple wooden racks where we lay the fruit out onto smaller plastic screens.

View through the top of our solar dryer
When the weather is cooler and we need to speed things up, we use an electric Excalibur dehydrator. This unit is very well made, has an adjustable thermostat, and the drying trays are easily cleaned in the dishwasher. This is the best home sized dehydrator we have seen.

Drying times will depend upon the fruit variety and size as well as the current weather. But typically the Excalibur will dry apricot halves in 15-20 hours. Fig halves will go a bit faster, pear halves may take a bit longer. We like to set the temperature knob to 125 degrees. But if the fruit is close to dry and it's bed time, we reduce the temperature to 95 deg. to avoid over drying.

Second Crop Figs
We're harvesting our second crop of figs now, and they should last another week or two. Most go to our main restaurant customer, but we do sometimes have extras for sale. Please call us at 707-448-4792 if you're interested.